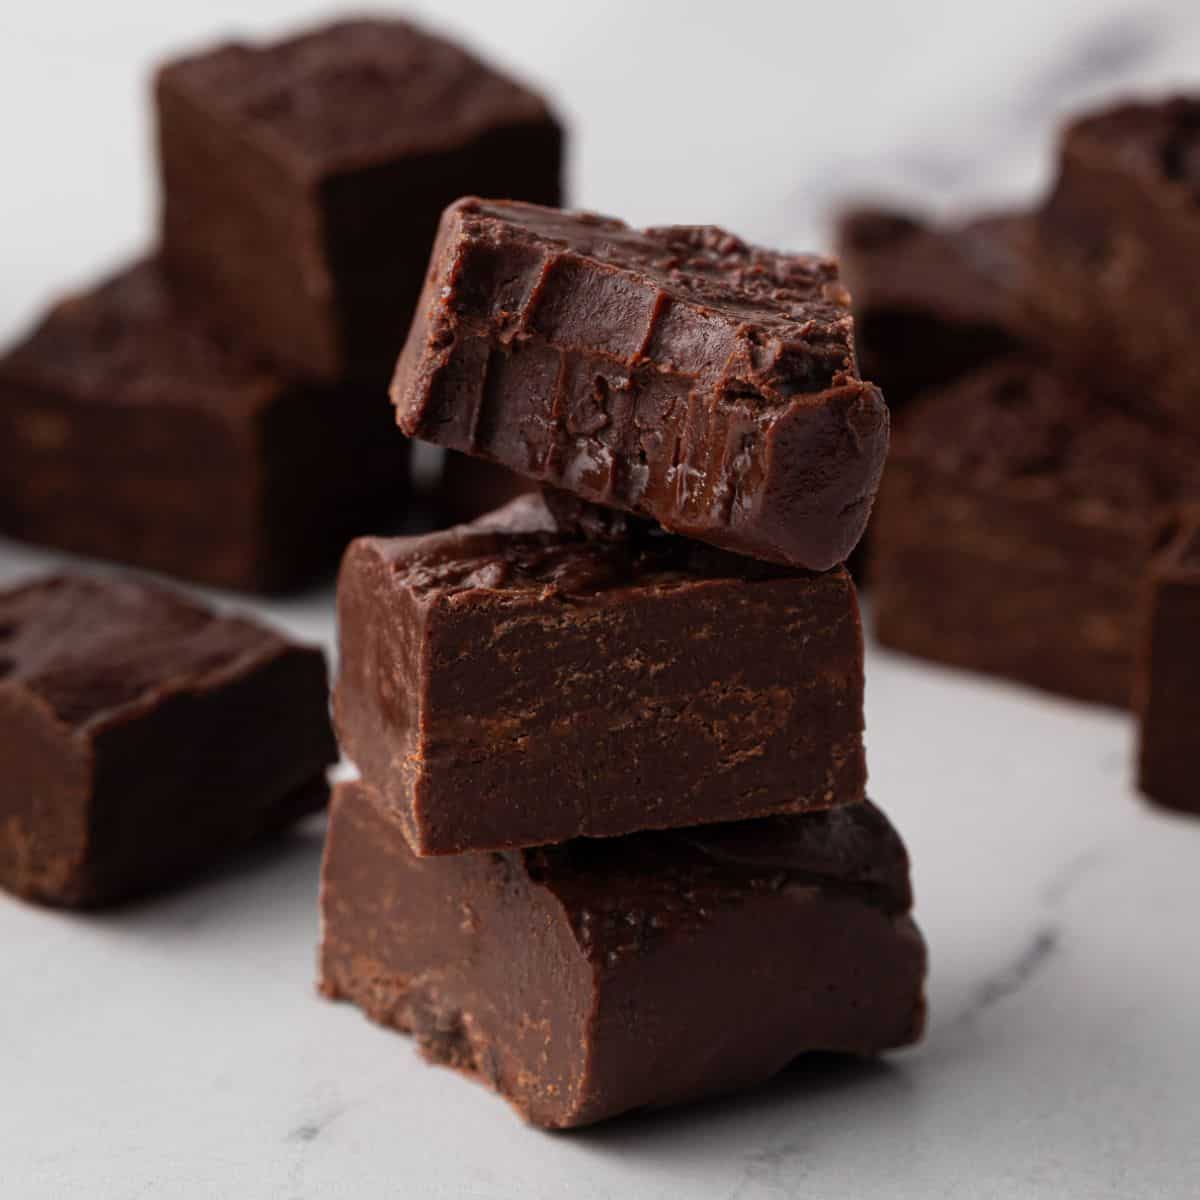
5 from 7 votes
3-ingredient chocolate fudge that’s rich, creamy, and stupid easy. Melt it, pour it, chill it—use your fav chocolate chips (or solid chocolate candy bar!), add sweetened condensed milk and a little butter and that's it!
3 pieces of fudge stacked on top of each other made with 3 ingredients, the top piece has a bite taken out showing the creamy texture

My Easy Chocolate Fudge Recipe At A Glance

Primary Cooking Method: Stovetop
Number of Ingredients: 3
Total Prep Time: 2 hours and 15 minutes chill time
Total Cook Time: 5 minutes
Level of Effort To Make: Easy Peasy
(Learn more about our recipe effort levels)

This fudge recipe is so easy, in my eyes, it’s the dessert equivalent of a mic drop. Yes, it “hits” that hard, and it only takes 5 minutes to throw together. You’re welcome!

Don’t get me wrong Traditional chocolate fudge is great and all, but when you’ve got 5 kids (and a husband who counts as a sixth), simplicity FTW. No candy thermometers, no double boilers, and definitely no stress—just 3 ingredients: sweetened condensed milk, chocolate chips, and butter are all you need to make a kickass chocolate fudge.

Any who, if you’ve got 5 minutes, 3 ingredients, and a saucepan, you’re basically a fudge master now and should definitely try making my 3 ingredient vanilla fudge and 3 ingredient peanut butter fudge, too!

3 Ingredients to Make Fudge

  • 14 ounces Sweetened Condensed Milk (1 can): This is a must as it adds sweetness and gives the fudge the consistency it needs to be called a fudge. And no, evaporated milk won’t work, so don’t even think about trying to swap it—you’ll just end up sad and fudge-less.
  • 3 cups Chocolate Chips: Pick your passion—milk, dark, semi-sweet, or a mix. I don’t recommend using white chocolate as the butter in this recipe makes it too greasy. I do have a 3 ingredient vanilla fudge recipe, though that is great for white chocolate.
  • 1/2 cup salted Butter: The secret to creamy fudge that doesn’t double as a doorstop. Only have unsalted butter? Use it. Just add a pinch of salt to the mix about 1/8 of a teaspoon. You can also use coconut oil at a 1:1 ratio if you prefer.

Make This Recipe Yours Additions

  • Nuts (½ cup): Chopped walnuts, pecans, or almonds. Stir them in before pouring the fudge into the pan, or sprinkle them on top and gently press them in before chilling.
  • Sea Salt (1 teaspoon): A sprinkle of flaky sea salt on top takes this fudge from sweet to chef’s kiss. Sweet and salty is always a win.
  • Peanut Butter Swirl (¼ cup): Drop dollops of melted peanut butter over the fudge and swirl it with a knife. Now it’s not just fudge—it’s art.
  • Mini Marshmallows (1 cup): For those Rocky Road vibes. Toss them in with some chopped nuts, and suddenly your simple fudge feels gourmet.
  • Crushed Candy Canes (½ cup): Perfect for the holidays. Sprinkle them on top before the fudge sets for a minty crunch.
  • Extracts (1 teaspoon): Swap out the vanilla for something fun like mint, orange, or almond extract. Just a small change, and you’ve got a whole new flavor.
  • Dried Fruit (½ cup): Chopped dried cherries or cranberries add a chewy, tangy twist that pairs perfectly with chocolate.
  • Espresso Powder (1 teaspoon): Stir this into the melted chocolate mixture for a mocha-inspired fudge that’ll have you buzzing.
  • Flavored Chocolate Chips (½ cup): Sprinkle flavored chips—like butterscotch, mint, or even caramel—on top of the fudge right after pouring it into the pan. They’ll melt slightly and add an extra layer of flavor without any extra effort.

How to make this Easy Chocolate Fudge

For detailed step-by-step instructions, be sure to check out the full recipe in the recipe card at the bottom of the page.

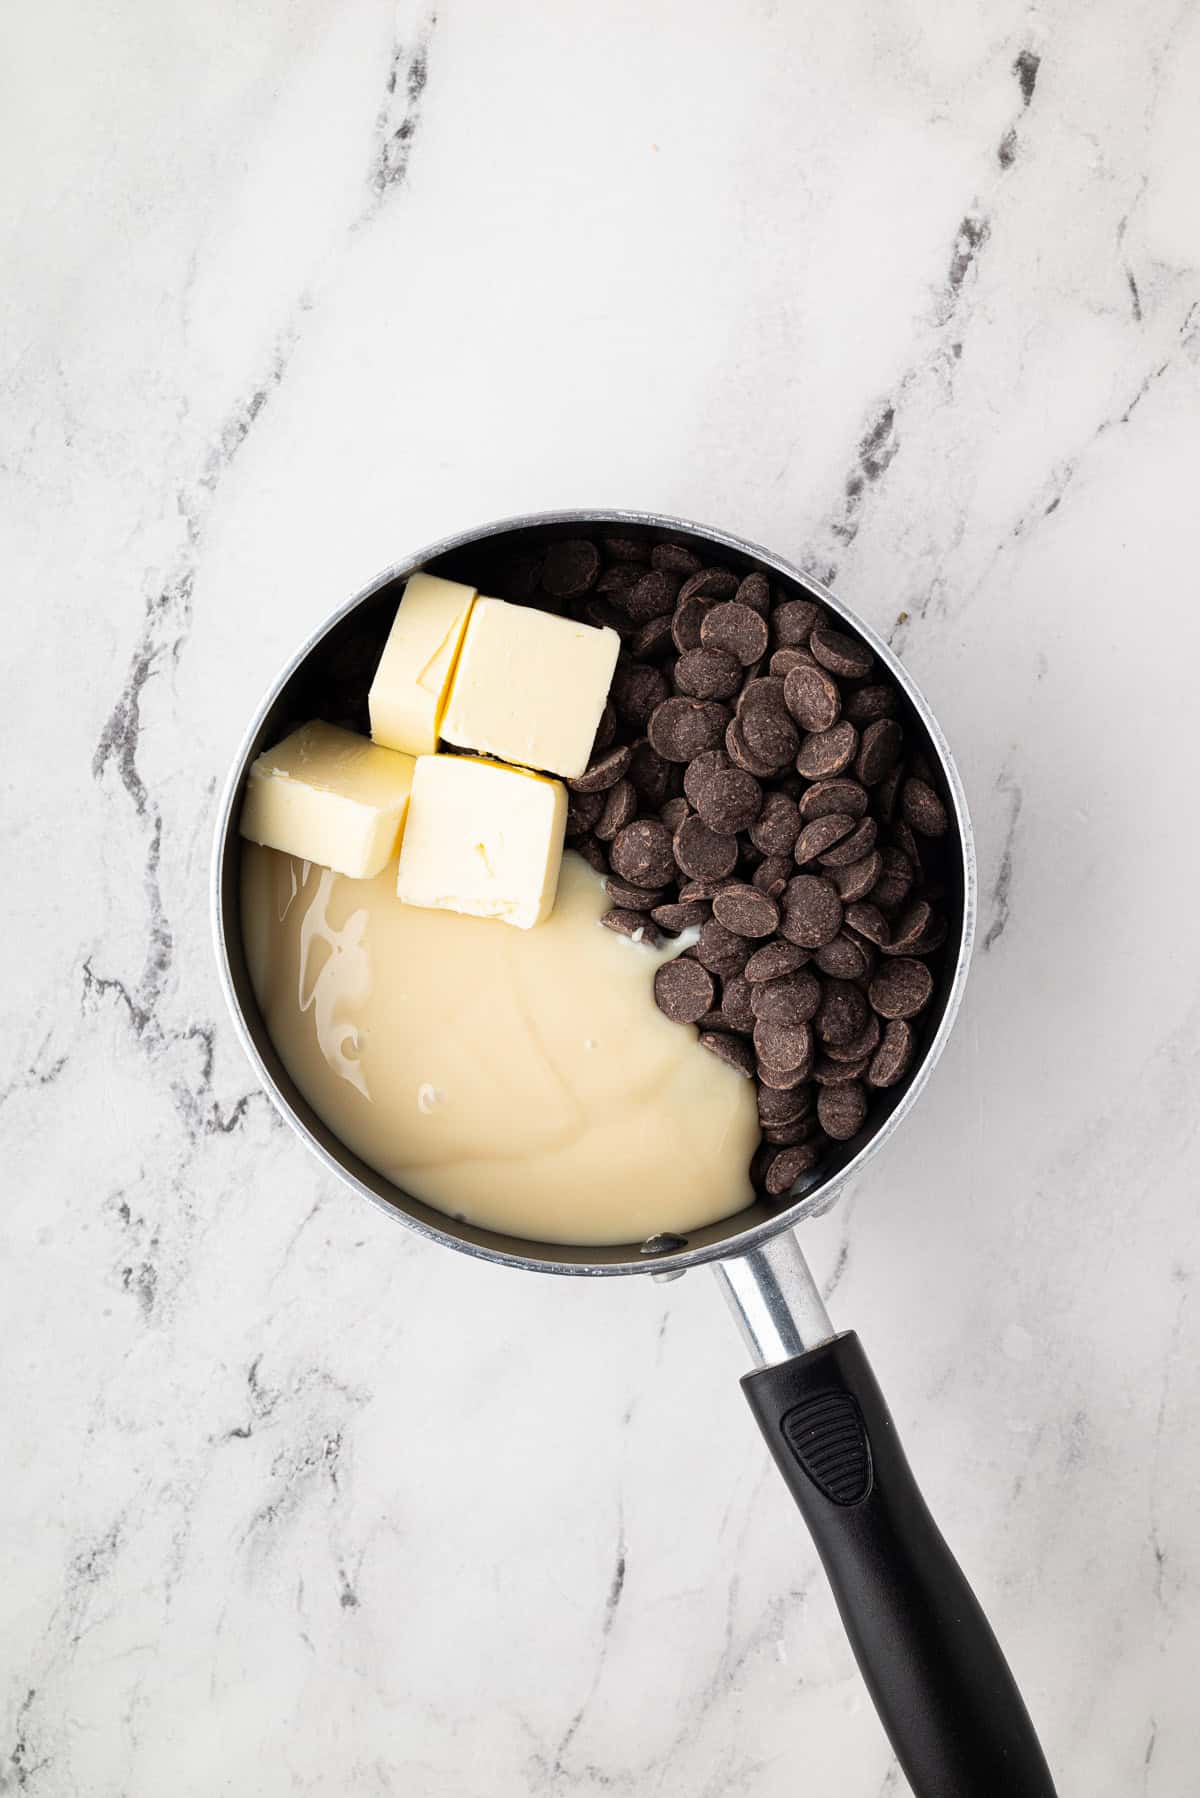
Step 1: Add the chocolate chips, sweetened condensed milk, and salted butter to a small saucepan.
Step 2: Place the saucepan over low heat. Stir constantly as the ingredients melt together.
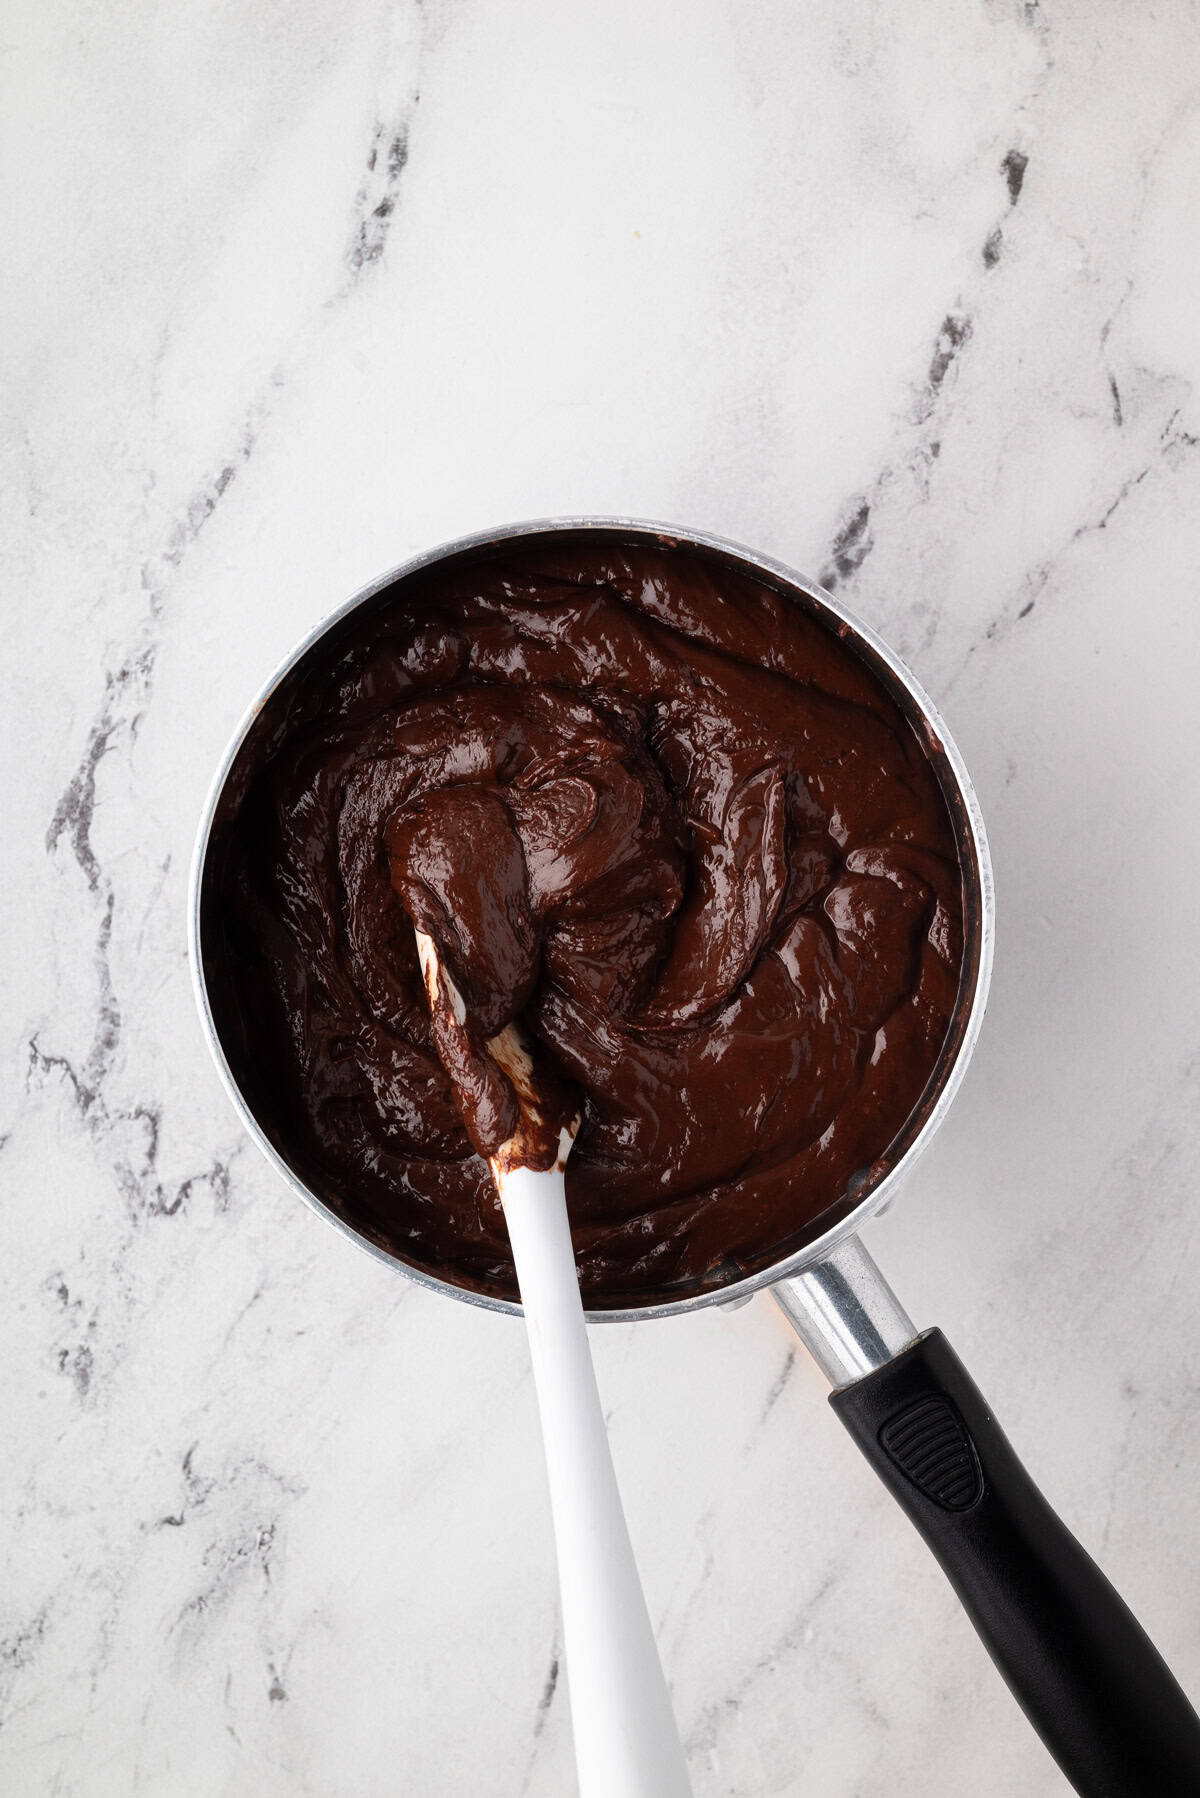
Step 3: As the chocolate melts, the mixture will thicken and take on a thick, frosting-like consistency. 
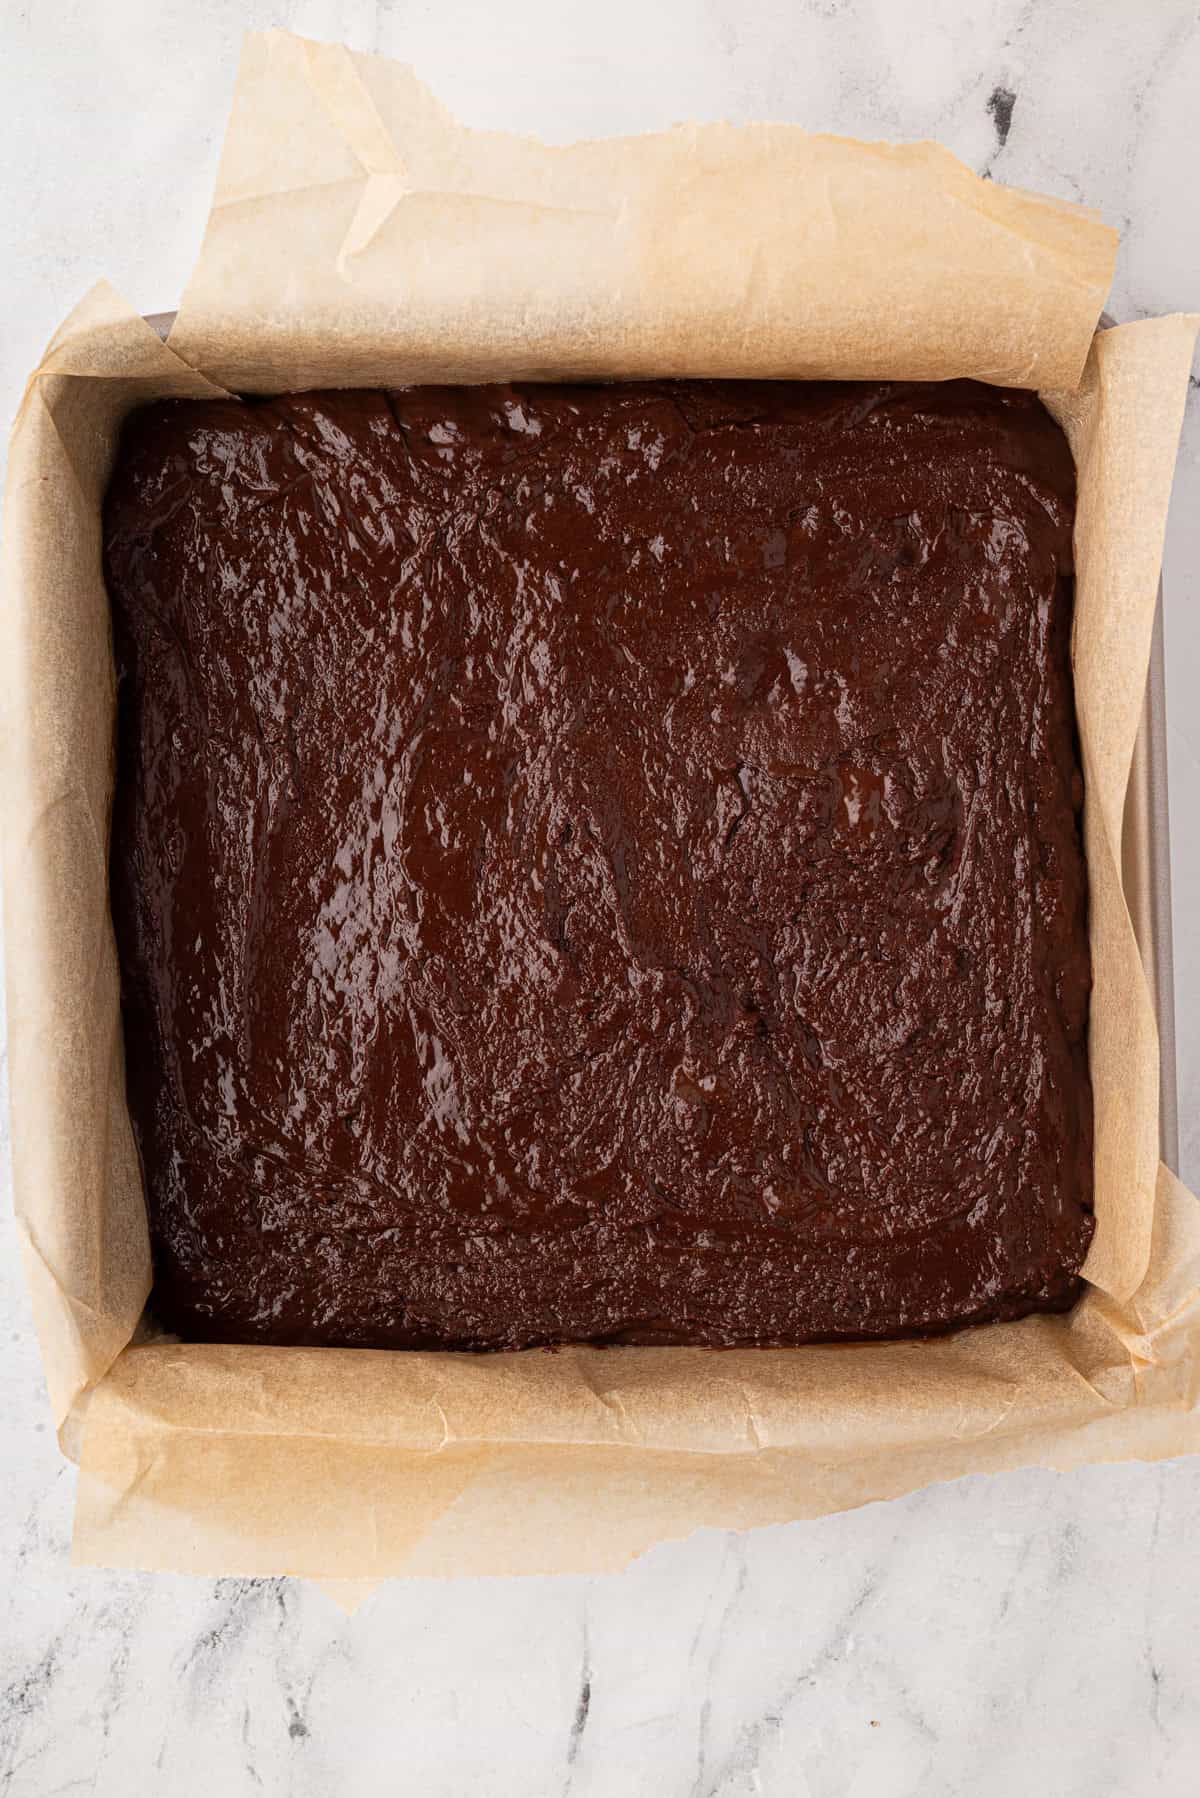
Step 4: Transfer the fudge to the lined pan. Press into the bottom and smooth into an even layer. Allow to set at room temperature or in the fridge.
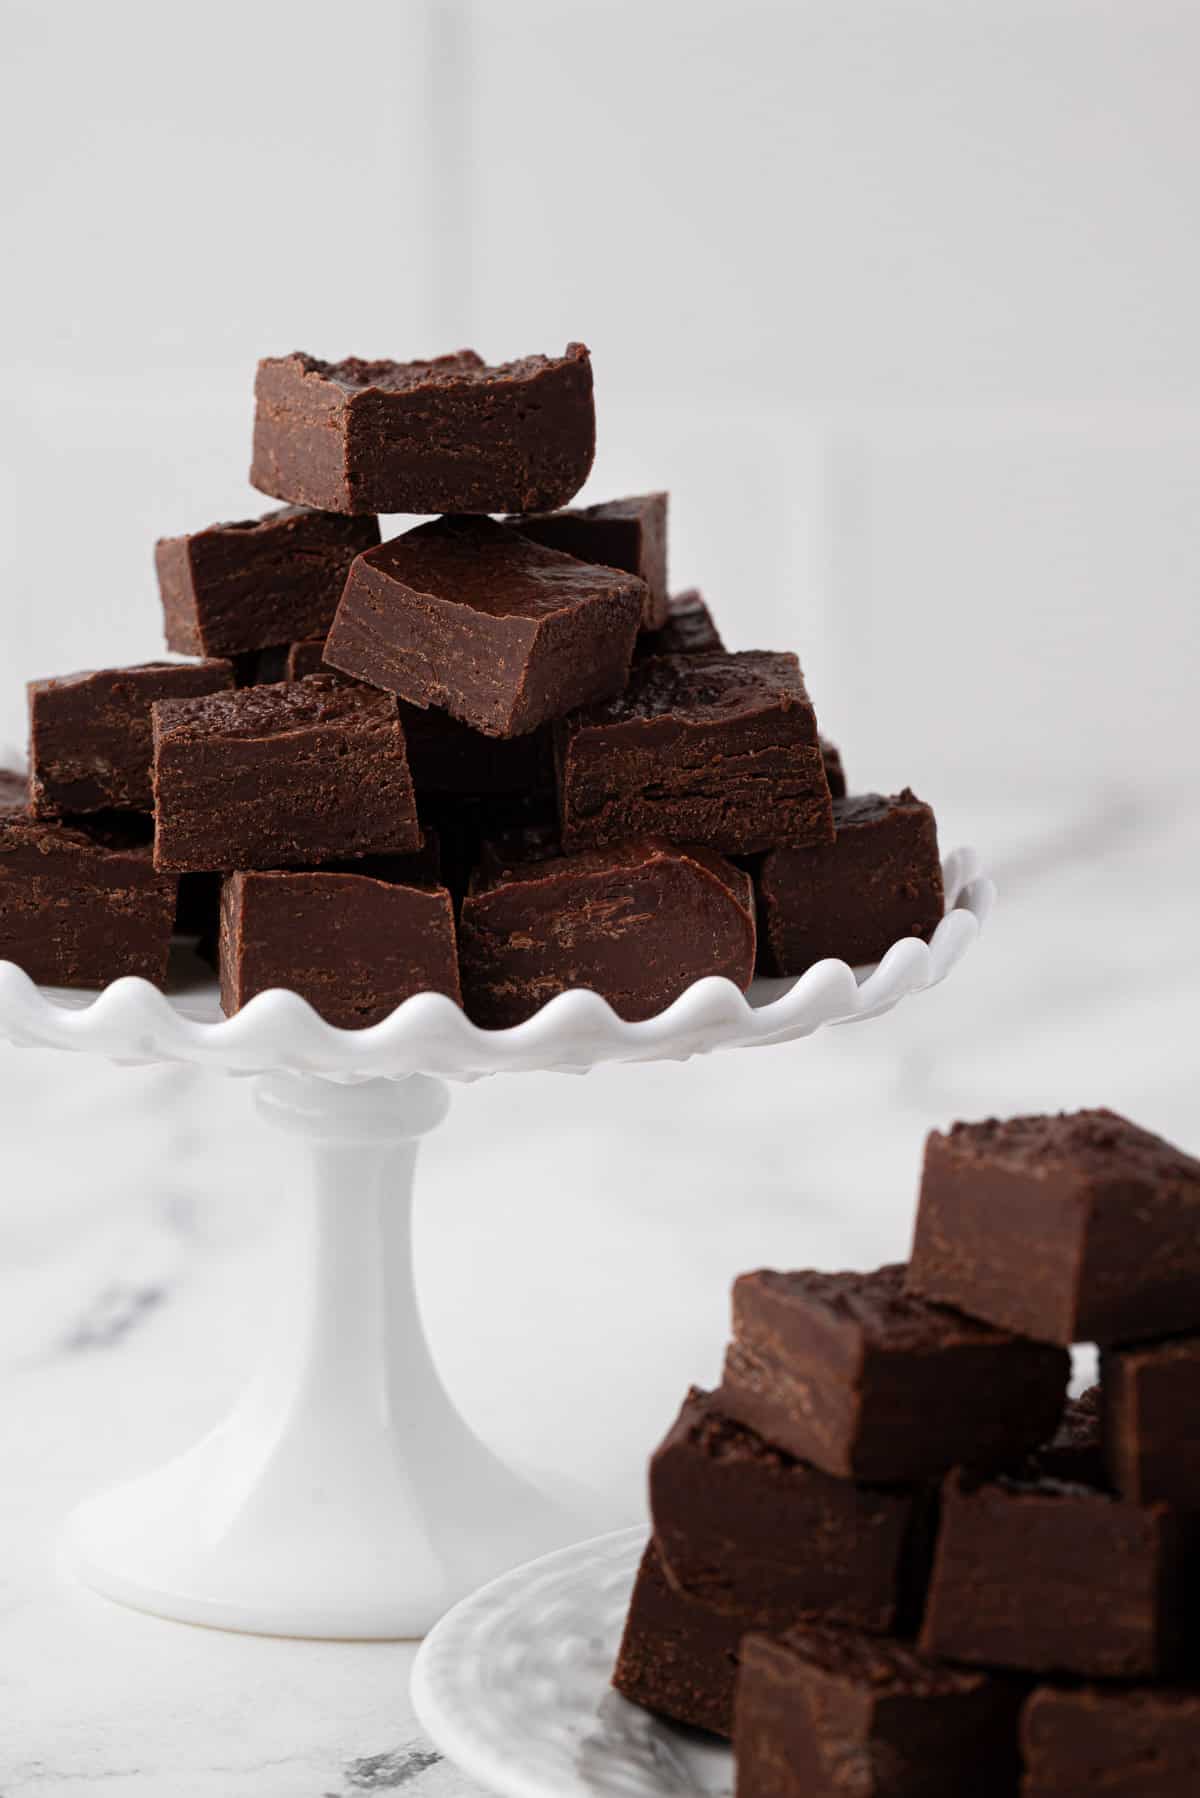
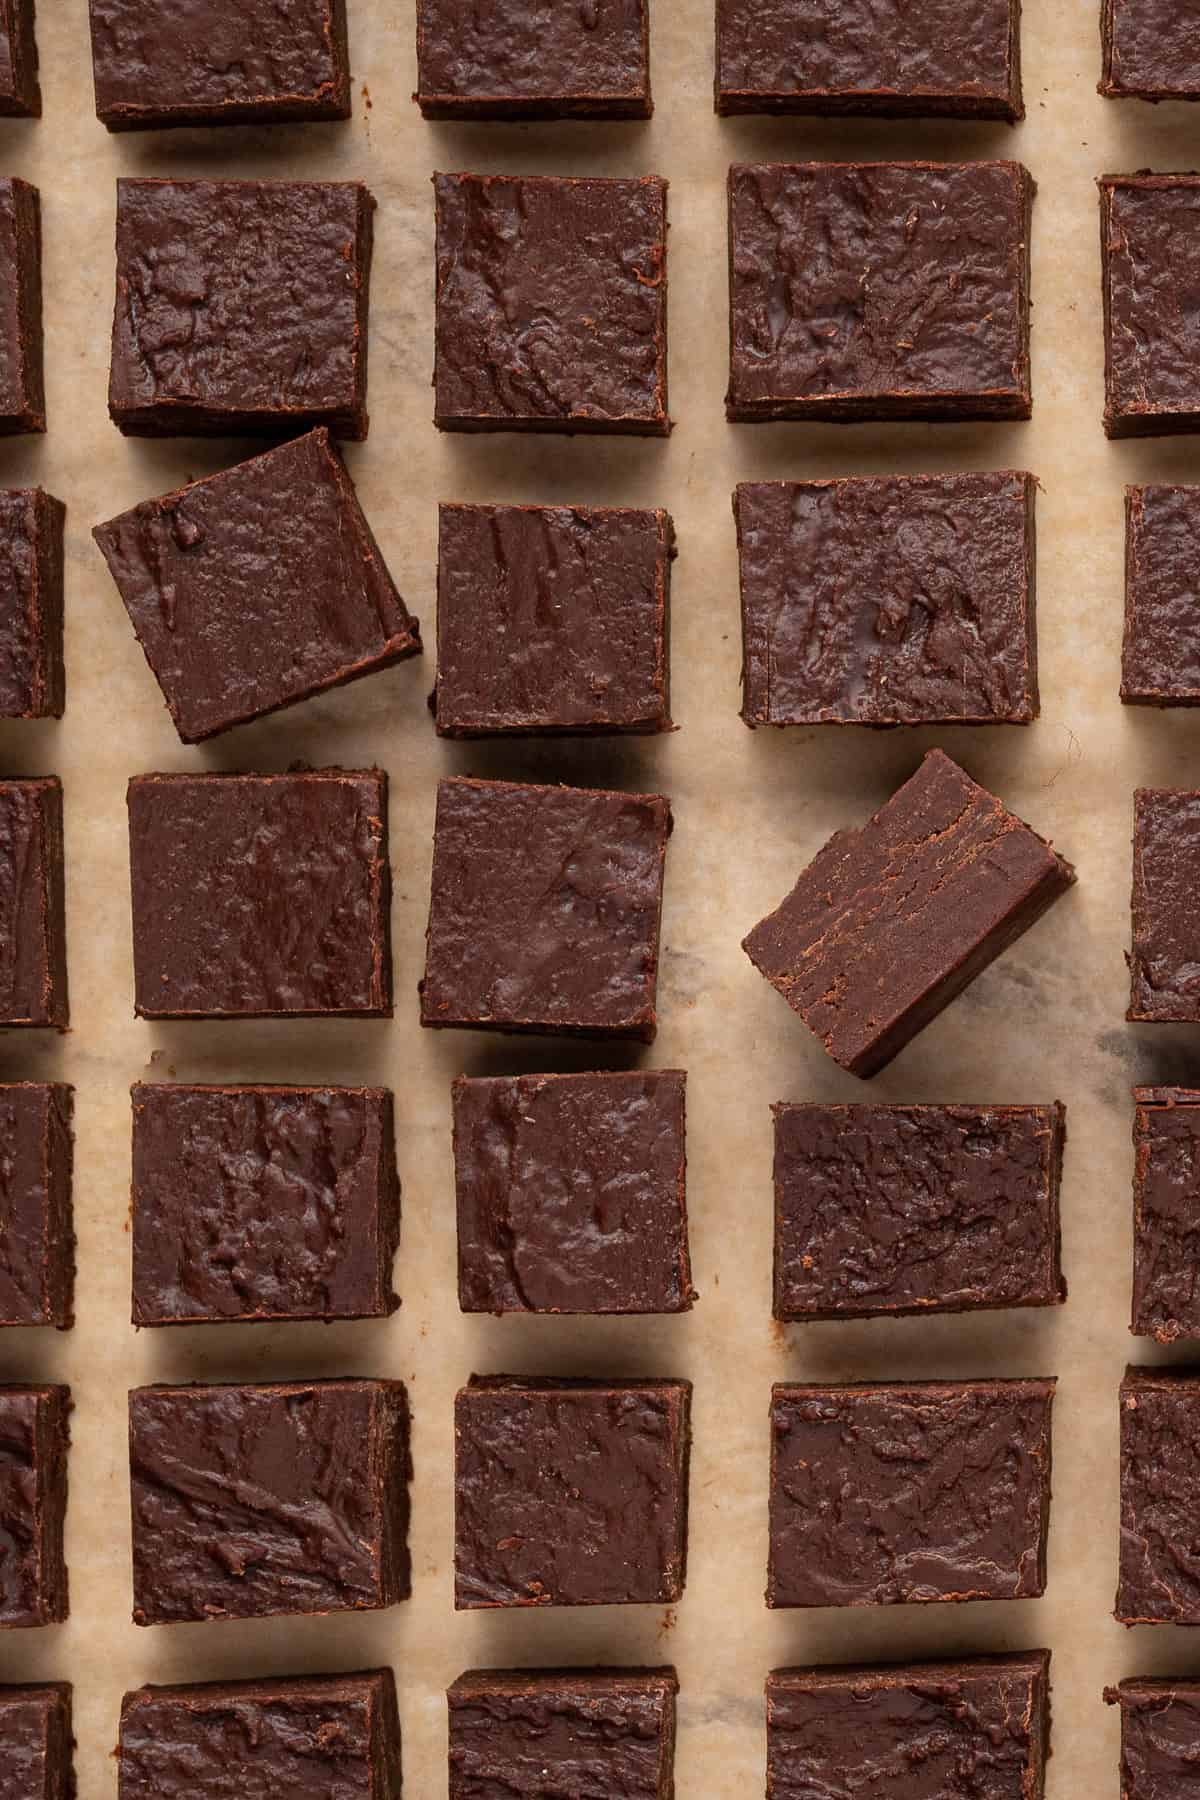
Step 5: Slice and serve.

Prep Ahead

Make It Early: This fudge can chill—literally—for up to a week in the fridge. Wrap it tight in plastic wrap or toss it in an airtight container. It’ll stay fresh, and you’ll look like the kind of person who totally has their act together.

Never Lose This Recipe—Email It to Yourself!

Make sure you have it when you need it! Bonus: You’ll get family-approved recipes and meal-planning tips, too!

Freeze It for Later: Got more holiday chaos than you can handle? Slice the fudge, wrap it up like little chocolate presents (plastic wrap or parchment works), and freeze for up to 3 months. Thaw it in the fridge overnight when you’re ready to be the dessert hero.

Double or Regret It Later: One batch? Amateur move. Double it now, save yourself the disappointment of running out when everyone starts “just one more”ing their way through the pan.

My Best Cooking Tips for Making Chocolate Fudge With Sweetened Condensed Milk

  1. Don’t rush the melting process: Keep the heat on low and stir constantly. High heat can scorch the chocolate or make the mixture seize, and no one, not even Martha Stewart, can rescue burnt fudge.
  2. Use Good Chocolate Chips: The better the chocolate, the better the fudge. Cheap chocolate chips will work, but if you’re making this for gifts (or yourself, let’s be honest), splurge on a brand you love eating straight from the bag.
  3. Line the Pan: Use parchment or foil to line your pan, and make sure to leave overhangs on the edges. This way, you can lift the fudge out in one piece instead of playing the “pry it out with a knife” game.
  4. Fat Is Non-Negotiable: Don’t skip the butter (or coconut oil)! It keeps the fudge smooth and creamy.
  5. Smooth It Out: Once the fudge is in the pan, use the back of a spoon or an offset spatula to spread it evenly and smooth the top. Or don’t—rustic vibes are totally a thing.
  6. Let It Set Completely: Resist the urge to slice too soon. Fudge needs at least 4 hours at room temp or 2 hours in the fridge to set properly. Cutting it too early will just make a mess (and a sad you).
  7. Cut Clean Slices: Use a sharp knife, and if you want Instagram-worthy squares, fill a cup with hot water, dip the knife in to warm the blade, cut, then wipe the blade clean and reheat between cuts.
white cake stand with chocolate fudge stacked in a triangle shape with more fudge on a white plate next to it.

How to store Fudge made with Sweetened Condensed Milk

At Room Temperature: Store fudge in an airtight container at room temperature for up to 5 days. Keep the container in a cool, dry spot (so, not next to your oven or in the sun), and layer the pieces with parchment or wax paper to keep them from sticking together.

In the Fridge: If your kitchen runs warm or you just want your fudge to last longer, stash it in the fridge. It’ll keep fresh for up to 2 weeks. Use an airtight container to avoid it picking up those mystery fridge smells. Nobody wants chocolate that tastes like onions.

In the Freezer: Need to make fudge way ahead of time? No problem. Freeze it! Once the fudge has fully set, slice it into squares and layer them with parchment or wax paper in a freezer-safe container. It’ll keep for up to 3 months. To serve, let it thaw in the fridge overnight or on the counter for an hour or two.

Quick Recipe Help and Common Questions

Why is my fudge grainy?

Grainy fudge usually means the chocolate overheated or wasn’t stirred enough while melting. Keep the heat low and stir constantly to ensure the mixture stays smooth. If it’s already grainy, sadly, there’s no saving it—time to start over.

Why isn’t my fudge setting?

If your fudge is too soft, it might not have had enough time to set. Let it chill in the fridge for at least 2 hours or at room temperature for 4 hours. Still too soft? Check if you measured the ingredients correctly—too much butter or sweetened condensed milk can throw off the consistency.

Why did my chocolate seize?

Chocolate can seize if it overheats or if moisture gets in (even a single drop of water can ruin it). Melt it over low heat and stir frequently. 

Why is my fudge soo hard?

You probably skipped lining the pan (rookie mistake!). Always use parchment or foil with overhangs so you can lift the fudge out easily. If it’s already stuck, gently warm the bottom of the pan to loosen it up—then line it next time!

a white plate piled high with fudge in a pyramid shape.

More 3 Ingredient Sweets & Treats Recipes

I want to hear from you!

If you try this easy 3 Ingredient Chocolate Fudge recipe or any other of my recipes on Meal Planning blueprints, then don’t forget to rate the recipe and leave a comment below! I read all the comments and respond!

3 ingredient fudge stacked in a tower of 3 with the top piece of fudge with a bite taken out of it to show the texture.
[be_recipe_buttons]

Easy Chocolate Fudge

3-ingredient chocolate fudge that’s rich, creamy, and stupid easy. Melt it, pour it, chill it—use your fav chocolate chips (or solid chocolate candy bar!), add sweetened condensed milk and a little butter and that's it!
5 from 7 votes
Author Jackie
Servings 24 1×1 inch squares
Course Dessert
Calories 199
Prep Time 10 minutes
Chill Time 2 hours
Cook Time 5 minutes
Total Time 2 hours 15 minutes

Never Lose This Recipe—Email It to Yourself!

Make sure you have it when you need it! Bonus: You’ll get family-approved recipes and meal-planning tips, too!

Equipment

Small Saucepan
8×8 Baking pan

Ingredients
  

  • 14 ounces sweetened condensed milk 1 can
  • 3 cups chocolate chips milk, dark or semi-sweet
  • ½ cup salted butter

Instructions

  • Line an 8×8-inch baking pan (or similar size) with foil or parchment paper, leaving some overhang on the sides for easy removal. Lightly spray with non-stick spray and set aside.
  • In a small saucepan, combine 3 cups of chocolate chips, ½ cup of salted butter, and 14 ounces of sweetened condensed milk (1 can). Stir the mixture to combine.
  • Place the saucepan over low heat. Stir constantly as the ingredients melt together. Keep the heat low to avoid scorching the chocolate or causing it to seize.
  • As the chocolate melts, the mixture will thicken and take on a smooth, frosting-like consistency. This should take about 5–7 minutes. Keep stirring to ensure everything is fully incorporated and glossy.
  • Once the mixture is smooth, pour it into the prepared pan. Use a spatula to press it evenly into the bottom, smoothing the top as you go.
  • Allow the fudge to set at room temperature for about 4 hours, or speed things up by placing it in the fridge for 2 hours until firm.
  • Lift the fudge out of the pan using the parchment or foil overhang. Slice into squares or rectangles with a sharp knife, wiping the blade clean between cuts for neat edges. Serve and enjoy!

Notes

  1. Don’t rush the melting process:  Keep the heat on low and stir constantly. High heat can scorch the chocolate or make the mixture seize, and no one, not even Martha Stewart, can rescue burnt fudge.
  2. Use Good Chocolate Chips: The better the chocolate, the better the fudge. Cheap chocolate chips will work, but if you’re making this for gifts (or yourself, let’s be honest), splurge on a brand you love eating straight from the bag.
  3. Line the Pan: Use parchment or foil to line your pan, and make sure to leave overhangs on the edges. This way, you can lift the fudge out in one piece instead of playing the “pry it out with a knife” game.
  4. Fat Is Non-Negotiable: Don’t skip the butter (or coconut oil)! It keeps the fudge smooth and creamy.
  5. Smooth It Out: Once the fudge is in the pan, use the back of a spoon or an offset spatula to spread it evenly and smooth the top. Or don’t—rustic vibes are totally a thing.
  6. Let It Set Completely: Resist the urge to slice too soon. Fudge needs at least 4 hours at room temp or 2 hours in the fridge to set properly. Cutting it too early will just make a mess (and a sad you).
  7. Cut Clean Slices: Use a sharp knife, and if you want Instagram-worthy squares, fill a cup with hot water, dip the knife in to warm the blade, cut, then wipe the blade clean and reheat between cuts.

Make This Recipe Yours Additions

  • Nuts (½ cup): Chopped walnuts, pecans, or almonds. Stir them in before pouring the fudge into the pan, or sprinkle them on top and gently press them in before chilling..
  • Sea Salt (1 teaspoon): A sprinkle of flaky sea salt on top takes this fudge from sweet to chef’s kiss. Sweet and salty is always a win.
  • Peanut Butter Swirl (¼ cup): Drop dollops of melted peanut butter over the fudge and swirl it with a knife. Now it’s not just fudge—it’s art.
  • Mini Marshmallows (1 cup): For those Rocky Road vibes. Toss them in with some chopped nuts, and suddenly your simple fudge feels gourmet.
  • Crushed Candy Canes (½ cup): Perfect for the holidays. Sprinkle them on top before the fudge sets for a minty crunch.
  • Extracts (1 teaspoon): Swap out the vanilla for something fun like mint, orange, or almond extract. Just a small change, and you’ve got a whole new flavor.
  • Dried Fruit (½ cup): Chopped dried cherries or cranberries add a chewy, tangy twist that pairs perfectly with chocolate.
  • Espresso Powder (1 teaspoon): Stir this into the melted chocolate mixture for a mocha-inspired fudge that’ll have you buzzing.
  • Flavored Chocolate Chips (½ cup): Sprinkle flavored chips—like butterscotch, mint, or even caramel—on top of the fudge right after pouring it into the pan. They’ll melt slightly and add an extra layer of flavor without any extra effort.

Nutrition

Serving: 1 square, Calories: 199kcal, Carbohydrates: 23g, Protein: 1g, Fat: 12g, Saturated Fat: 7g, Polyunsaturated Fat: 0.2g, Monounsaturated Fat: 1g, Trans Fat: 0.2g, Cholesterol: 16mg, Sodium: 51mg, Potassium: 127mg, Sugar: 22g, Vitamin A: 162IU, Vitamin C: 0.4mg, Calcium: 64mg, Iron: 0.03mg

Nutrition information provided is an estimate. It will vary based on cooking method and specific ingredients used.

Cuisine American

Similar Posts

14 Comments

  1. 5 stars
    Made this weekend along with your pb fudge recipe for a get together and it turned out great, didn’t have a piece left to take home!

  2. 5 stars
    I never leave reviews, but I had to for this. I made a batch to take to a party, and everyone just gushed over how great it was! I am going to be making some more and giving them out as gifts! Thank you for the recipe!

5 from 7 votes

Leave a Reply

Your email address will not be published. Required fields are marked *

Recipe Rating